Friday, June 29, 2012
Hello again!
Just a quick update to confirm that I haven't completely disappeared. I have made a few cards in the last couple of weeks that I haven't taken pictures of just yet. Things got a little hectic around here and now my in-laws are up for the weekend so I've been pretty occupied. I a doing a workshop tomorrow so I'll be busy tonight getting everything ready for that. Nothing like waiting until the last minute, right?!
Sunday, June 17, 2012
10-14 of 100
Now, don't be fooled by the fact that there will only be three cards pictured here. Cards 11 and 12 were actually remakes of two of my Herb Expressions set that I did before 100 in 100 - my co-worker needed me to make four more each of Rosemary and Lavender, so I counted each as one. It helped get me caught up, anyway ;)
Now, on to the fun!

This is a card I made based on another Mojo Monday sketch and ColourQ color combo, but I think I accidentally threw away the paper where I had written down which ones they were and to be honest, I'm feeling too lazy to go looking for them.
Here's what I don't like: the Old Olive DSP. It just doesn't fit at all. But, the important thing is to take what you don't like and learn from it. Next time I make a card like this it won't be so weird! Haha.
SUPPLIES
Stamps: For the Birds
Cardstock: Crumb Cake, Whisper White, Not Quite Navy, Daffodil Delight, Old Olive (Brights DSP Patterns Stack)
Ink: Basic Black
Other: Whisper White Bakers Twine, Dimensionals

Now, if you'll all let me be boastful for a minute, I love this card. A good friend of mine is getting married this weekend so I made this card for her and her soon-to-be-husband. I embossed white on white for the dress (this is the Love & Laughter set minus the hanger and straps on the dress - I used the Versamarker to selectively not include that part). The bow tie and lapels on the tuxedo are clear embossed on the black to give it a visual difference, which didn't photograph well. The buttons on the tux are basic pearls colored black with a Sharpie. I embossed the sentiment in white and clear embossed Real Red and punched the hearts.
SUPPLIES
Stamps: Love & Laughter
Cardstock: Basic Black, Whisper White, Real Red
Ink: Versamark/Versamarker
Other: Small Heart Punch, Pearl Basic Jewels, Dimensionals

For this one I just had a hankering to do a rainbow card. No real reason. I like the idea of the pinwheel stamp but it just doesn't look right the way it's colored. And I tried coloring it like, four different ways, and I just didn't end up with anything I liked though what I ended up with was the best (or I was sick of trying, haha). I'm also showcasing some new stuff I got the other day! Large Oval, Scalloped Oval, and Modern Label punches! I'm not sure how well you can read the sentiment (I inked it with a marker and it stamped kind of light) but it reads "hip hip hooray".
SUPPLIES
Stamps: Happy You
Cardstock: Crumb Cake, Real Red, Tangerine Tango, So Saffron, Gumball Green, Pacific Point, Island Indigo, Perfect Plum, Watercolor Paper
Ink: Stampin' Write Markers in Pacific Point, Real Red, Tangerine Tango, So Saffron, and Gumball Green
Other: Modern Label, Word Window, Large Oval, Scalloped Oval punches; white gel pen
And I leave you with this last little bit for the day -- my very own stamping cat, Minerva. She loves being up in my room with me. This is a picture of her curled up in my Stampin' Up! box. I thought it was appropriate ;)

Saturday, June 16, 2012
Mission: Organization
So I have decided that before I make ANY more cards I have got to clean and organize my room. I got all sorts of new stuff on Thursday and I haphazardly put it all away so I'm making good homes for new embellishments and my Big Shot. I also usually craft at night and don't like to clean up after so my table is a disaster and there are scraps everywhere. Ergo, I am cleaning AND possibly purging some stuff I don't use - there are two ladies that have papercrafting classes at the library every month and I think I'll donate some of my stuff to them to use for the classes. That'll clear out some space for whatever tickles my fancy in the future... :)
Wednesday, June 13, 2012
8 & 9 of 100
Hello again! Tonight I have projects 8 and 9 for you :)
#8 was inspired by Mojo Monday #242
 And here is what I came up with!

I paper pieced the top of the umbrella in Tempting Turquoise. Both the image and the sentiment are stamped crooked -_- The writing on the umbrella reads "Friendship is a cozy shelter from life's rainy days."
SUPPLIES
Stamps: The Fine Print, Teeny Tiny Wishes
Cardstock: Basic Gray, Tempting Turquoise, So Saffron, Whisper White, Melon Mambo (Brights DSP Patterns Stack)
Ink: Basic Gray
Other: Scallop Trim Border Punch, Dimensionals, White Gel Pen
And Card #9 was inspired by Mojo Monday Sketch #166 and Colour Q #18

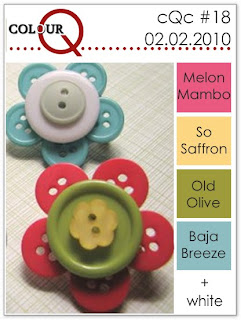
And I ended up with this:

At first I was not so sure about the color combination, but I wanted to try to challenge myself out of my comfort zone. I tried to use Old Olive DSP but it just stood out more than it should have. I decided then to do the sentiment in Old Olive instead and make it much more subtle, and it worked great, I think! I very very lightly sponged the edges of the oval in Old Olive, too. I realized that I stamped the sentiment too low on the oval so I punched some flowers with a Studio G punch and added white dots with my gel pen. I really like how it turned out :) I think I would definitely make more cards like this!
SUPPLIES
Stamps: Fabulous Phrases
Cardstock: Baja Breeze, Whisper White, Melon Mambo, So Saffron (Subtles DSP Patterns Stack)
Ink: Old Olive
Other: XL Oval Punch, Flower Punch*, Dimensionals, White Gel Pen
All supplies from Stampin' Up! unless marked with a *.
Now, I just want to say that the other ladies doing the 100 in 100 Challenge with me are coming up with some fab cards! I have lots of ideas for projects to do in the future.
I'm not sure if I'll be posting tomorrow night or not. I get my new stuff tomorrow! Which means either I'll take it all out and put it away nice and organized-like, or I'll rip a few things open and play (I, uh, I bought a Big Shot. SO EXCITED). Anyway. I think I might take some pictures of my craft room soon and post them. I'd love to see pictures of everyone else's space too!
Well, that's all for tonight. Have a good one! :)
#8 was inspired by Mojo Monday #242


I paper pieced the top of the umbrella in Tempting Turquoise. Both the image and the sentiment are stamped crooked -_- The writing on the umbrella reads "Friendship is a cozy shelter from life's rainy days."
SUPPLIES
Stamps: The Fine Print, Teeny Tiny Wishes
Cardstock: Basic Gray, Tempting Turquoise, So Saffron, Whisper White, Melon Mambo (Brights DSP Patterns Stack)
Ink: Basic Gray
Other: Scallop Trim Border Punch, Dimensionals, White Gel Pen
And Card #9 was inspired by Mojo Monday Sketch #166 and Colour Q #18


And I ended up with this:

At first I was not so sure about the color combination, but I wanted to try to challenge myself out of my comfort zone. I tried to use Old Olive DSP but it just stood out more than it should have. I decided then to do the sentiment in Old Olive instead and make it much more subtle, and it worked great, I think! I very very lightly sponged the edges of the oval in Old Olive, too. I realized that I stamped the sentiment too low on the oval so I punched some flowers with a Studio G punch and added white dots with my gel pen. I really like how it turned out :) I think I would definitely make more cards like this!
SUPPLIES
Stamps: Fabulous Phrases
Cardstock: Baja Breeze, Whisper White, Melon Mambo, So Saffron (Subtles DSP Patterns Stack)
Ink: Old Olive
Other: XL Oval Punch, Flower Punch*, Dimensionals, White Gel Pen
All supplies from Stampin' Up! unless marked with a *.
Now, I just want to say that the other ladies doing the 100 in 100 Challenge with me are coming up with some fab cards! I have lots of ideas for projects to do in the future.
I'm not sure if I'll be posting tomorrow night or not. I get my new stuff tomorrow! Which means either I'll take it all out and put it away nice and organized-like, or I'll rip a few things open and play (I, uh, I bought a Big Shot. SO EXCITED). Anyway. I think I might take some pictures of my craft room soon and post them. I'd love to see pictures of everyone else's space too!
Well, that's all for tonight. Have a good one! :)
Monday, June 11, 2012
7 of 100 - Redux
Here's another card file box that I made yesterday with my Stampin' Up! stuff. I made four dividers with tabs, though you could easily make more. I have about ten or so cards in there and there's plenty of room left for more!


SUPPLIES
Stamps: Teeny Tiny Wishes
Cardstock: Night of Navy, Bashful Blue, Subtles DSP Patterns Pack (Bashful Blue), Whisper White
Ink: Night of Navy
Other: Word Window Punch, 3/16" Corner Punch
I ran the Whisper White punched pieces through my Xyron (the little X one) - first time I've used the Xyron and it worked well! I'm down to my last SNAIL refill right now and I don't want to run out, especially since I have cards that I "have" to make (I'm actually getting paid for them!) and my SU! stuff - all 30 lbs of it! - doesn't get here until Thursday night. But I will have some fun new toys to play with this weekend! :D I will not admit how much money I spent. Nope.
Anyway, I think this box is really cute and might make a good "set" gift instead of a typical A2 box. I had fun challenging myself to figure out how to do it so overall I'd call it a success.
In other crafty news, Joanns has a BOGO deal on OttLights right now. I'm thinking about getting a couple of the small ones. The lighting in my room is terrible (hence yellow-ish backgrounds and too dark darks), but it also makes it hard to see what I'm doing! I've been reading some good things about OttLights and I figure if I don't like it, I can always bring it back. I'd probably start with just the tabletop ones to see how I like them and then get a floor lamp later down the road if I "need" to. Do any of you have OttLights? How do you like them?
That's all for now! I have dreams of making a card tonight still!
Sunday, June 10, 2012
7 of 100 - A Tutorial!
Hello again!
I saw this card file box on Pinterest the other day. I went to the original blog post to find instructions, only to find out that the template for purchase (!) is no longer available, so I said to myself, "Self! Figure it out." And I did!
There are a lot of pictures. I hope the instructions are clear enough if anyone wants to try this. The tutorial so far is for the box only, not the dividers which I have not attempted yet (it's too hot to spend any more time in my craft room for the time being). Because I was really trying this out to see how it worked I used some old materials I have on hand from before I was a demo. The white cardstock is from Georgia Pacific and the patterned paper is from Recollections.
Away we go!
YOU WILL NEED
- two 7 3/4"x8 3/4" pieces of cardstock
- two 4 1/2"x5 1/2", one 1 3/4"x1 3/4", and one 5 1/2"x1 3/4" pieces of patterned paper
- paper trimmer, scoring tool, craft knife (optional), ruler
- pencil
- adhesive runner, Sticky Strip
- scissors
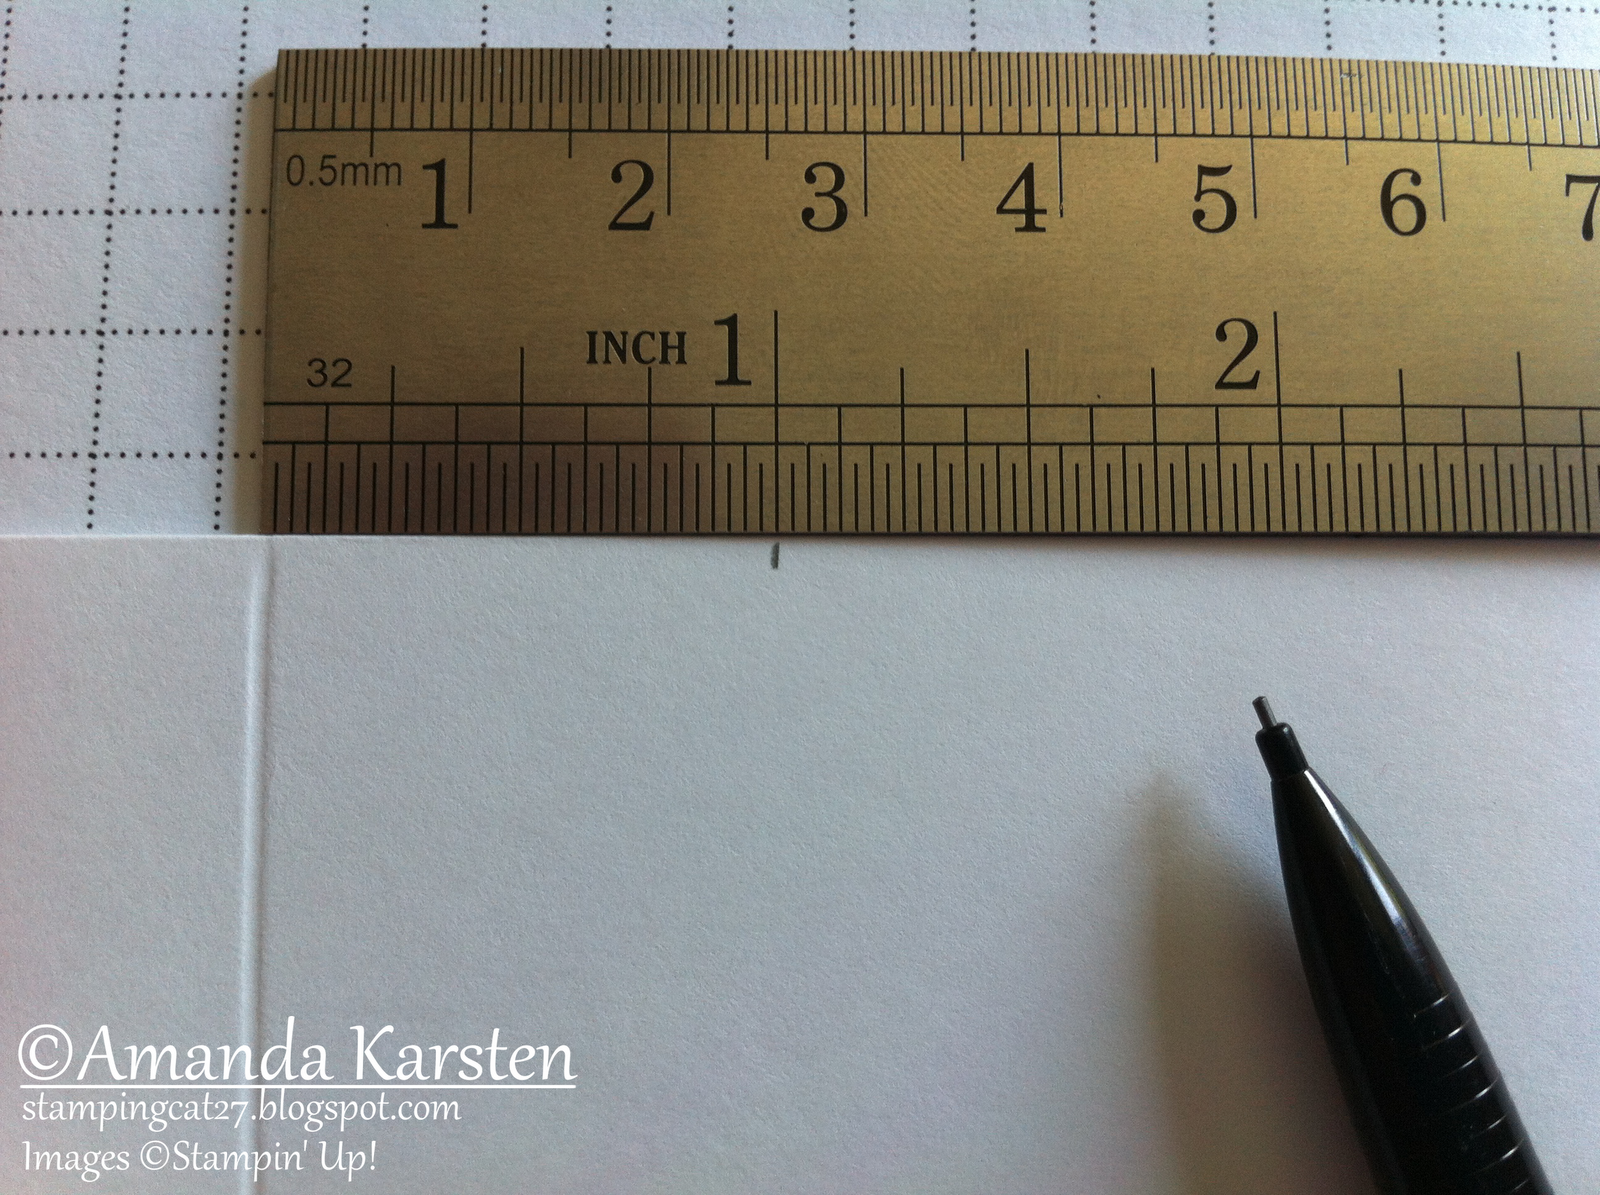
STEP ONE

Score your cardstock at 2" and 6 3/4" (long side up). You will do this to both pieces.
STEP TWO

Turn the cardstock and score at 2". You will do this to both pieces.
STEP THREE

Snip the 2"x2" corner pieces off of ONE piece of cardstock (we'll call this A)
STEP FOUR

Snip the 2"x2" corner pieces of the other piece of cardstock as shown in the picture(we'll call this B). These will become glue tabs.
STEP FIVE
(Now is a good time to pre-fold your score lines. I found this helped me keep everything orientated correctly.)

Measure 2" up from the bottom score line of B. Make a mark with your pencil on the right-hand score line. The score lines on my B piece were mountains up.

Use a craft knife or your paper trimmer to trim down the right-hand score line until you hit your pencil mark. Then cut inward from the right-hand edge to your pencil mark (you will essentially be removing a 2"x3 3/4" piece).
Then measure 1" in from the left-hand score line on the top of B. Mark with your pencil.

Use your ruler and a craft knife (or paper trimmer) to connect your top pencil mark with the corner of the cut you just made. Cut that piece off.

This is what it should look like.
Repeat this same process with piece A, except you'll want the valleys up to create a mirror of piece B.

This is what it should look like with valleys up on both pieces.
STEP SIX

Take your first piece of 4 1/2"x5 1/2" piece of patterned paper. Make a pencil mark (long side) on the right-hand side at 1 3/4" from the bottom. Make a pencil mark on the top at 3/4" from the left-hand edge. Connect the dots with your ruler and cut off with your craft knife (just like you did to the cardstock pieces earlier).

Take your second piece of 4 1/2"x5 1/2" piece of patterned paper and turn it UPSIDE DOWN under your already trimmed piece. The fact that it's upside down is very important - don't ask me how I know this. Using your ruler as a guide, trim the second piece using the first as a template.

This is what you should have.
STEP SEVEN

Using your adhesive runner, attach the patterned paper to piece B as shown.

Then attach the last two pieces of patterned paper to piece A.
STEP EIGHT

Add Sticky Strip to piece B as shown.

Then add Sticky Strip to the bottom flap of piece A - valleys up.

Then add Sticky Strip to the back flap as shown - mountains up.
STEP NINE

I adhered the bottom first, then the front, then the back. In the end, this is what you should have.
And that's it! You can stamp images instead of using patterned paper, use different colors, whatever you want.
Again, sorry if something isn't clear. I've never written a tutorial before. I know personally I get a better feel for a project from a video tutorial, but I am not the "make-a-video-tutorial" type of person. If any of you would like to try, feel free! Just please link back here :)
Any questions, please ask. If I wasn't clear, let me know and I'll try to fix the description. I might have gotten in too close on some of the pictures. Oh well. Live and learn!
Enjoy :)
Saturday, June 9, 2012
6 of 100
Just a quickie post for now as I have to leave for a wedding in about 10 minutes!
I made this card for said wedding last night. I think it turned out pretty cute!


SUPPLIES
Stamps: Confetti, Love You Much, Teeny Tiny Wishes, Best Yet
Cardstock: Basic Grey, Whisper White, So Saffron, Real Red
Ink: Versamark, Basic Black
Other: Dimensionals, Silver Detail Embossing Powder, Heart Punch*, So Saffron Ribbon (from 2010 SAB)
All supplies from Stampin' Up! unless marked with a *.
That's a gift card pocket I made on the right flap of the gate. Super easy! And it fit perfectly on there too, which was awesome.
Thanks for looking :) I'm off!
Tuesday, June 5, 2012
2-5 of 100
So, I finished up my 6x6 One Sheet Wonder cards tonight. I still don't love them but letting them sit overnight made me not hate them as much as I did yesterday. No matter what I did I just couldn't achieve the "look" I was trying for, but I buckled down and made it work anyway!
I originally found the template for this particular OSW on Pinterest -- here is the link to the original for anyone interested in the template.
On to the cards!


SUPPLIES
Stamp Sets: Best Yet (retired), Congrats (retired), Love You Much (retired)
DSP: Delicate Dots (retired)
Cardstock: Bashful Blue, Whisper White
Ink: Basic Black
I'm not sure if you can tell by the pictures but I popped the sentiments up with Dimensionals. If you look close you can also see the shadow from the screen in my window -_- The "congratulations" stamped image didn't turn out well, so I re-stamped it on the other side and it was worse. I have already wasted an unbelievable amount of paper trying to get the look I wanted so I just stuck with it! I actually "cheated" a little with the 6x6 part of the OSW template. I didn't like the reverse sides of either of the DSP patterns I used so I just cut both of them. Now I have another template in reverse of what I used to use again!
As frustrated as I was with this particular project I'm pretty happy with the results. I like the layouts of the cards in general and would likely use this template for a 6x6 OSW again, now that I've figured out how to really do it.
Thanks for stopping by!
Monday, June 4, 2012
Working!
Hello all! I am in the midst of cards 2-5 in the 100 in 100 series. I have to say, honestly, I'm not loving what I see tonight but I will put the cards together (I tried a 6x6 One Sheet Wonder) and finish them up tomorrow. A new day and new eyes might make all the difference!
In other stamping news, I applied tonight to be a Chemo Angel (chemoangels.net) so hopefully I will get a match soon! My grandmother recently lost her fight with cancer and I think being an Angel would be a great way to honor her memory. And I'd love to make someone smile! Cancer is tough and sometimes you need all the smiles you can get.
Well, off to put these cards together. Look for pictures tomorrow!
Saturday, June 2, 2012
1 of 100
Well! I've completed my first 100 in 100 card!
This is actually a semi-recreation of a card I made yesterday (that I didn't count). It was a co-worker's birthday and I forgot (!) to make it the night before. I used a different color scheme and a different stamp, but the basic layout is the same.

SUPPLIES
Stamp Set: Happy You (Hostess set from the 2012-2013 Stampin' Up! Catalog)
Cardstock: Midnight Muse, Primrose Petals, So Saffron, Whisper White
Ink: Basic Black
Colors: Colored Pencils*, White Gel Pen
All supplies from Stampin' Up! unless marked with a *.
I know you'll forgive me if the colors are a little off. It's been rainy all day and I don't have the greatest lighting in my craft room (yet!).
I would've liked this card better with a sentiment stamped on the front, but I don't have the items I want to get the look I want (again, yet).
Which reminds me! Many folks doing the 100 in 100 challenge are doing so (or trying to do so) without buying anything new. Not me! I don't have as much of a stash built up as some do, so I'm not worried about being overloaded with supplies. I mean, really. I only have two punches!
I've also discovered some One Sheet Wonder templates today, so I'm eager to try that out soon. AND I've been playing on Pinterest a lot. Happy stamping, everyone!
Subscribe to:
Comments (Atom)